Sunday, January 15, 2012

Riso and Peas and a Little Lamb


 Riso

Cast Iron Skillet, set on medium high heat
2 Tbs Unsalted Butter and 2 Tbs Better than bullion, Beef 
1/2 Small Sweet Yellow Onion, minced
Cook till translucent
1 Cup Riso, pasta
Toss into pan with onion, mix well.
2 Cups Hot Chicken Stock - Add to the Riso in 1/2 Cup increments, stir till 1/2 Cup stock is absorbed. Continue adding 1/2 Cup till all 2 Cups are absorbed...takes about 20 minutes.
1 to 2 Cups Petite Peas, stirring well (I love peas, so I use all 2 cups)
Set aside while making the lamb, working in 1/2 Cup of the Romano into the Riso.


~~~~~~~~~~~~~~~~~~~~~~~~~~~~~~~~~~~~~~~~~~~~~
 Lamb

Cast Iron Skillet, set on medium high heat
2 Tbs Olive Oil
1 Small Sweet Yellow Onion, minced
1 Pound Ground Lamb
Sauté lamb and onion together with 2 Tbs garlic (more or less to taste), till lamb is no longer pink.
Add 1 can drained, diced tomatoes
1 Tbsp Cinnamon
2 Tbsp Greek Oregano
Continue to cook on medium low heat for about 10 minutes.
Tilt pan to one side, separating food from juices/fat. 
Do this if you like a less wet lamb, and ladle with slotted spoon on dish along side the Riso.
Sprinkle generously with Romano grated over all!  Enjoy!


Fancy or plain Buttermilk Biscuits (...childhood mud pie experience a PLUS!)


Biscuit ingredients are few, but the different ways to use it are endless!

This mixture can be the most easy flexible family secret you can pass down.

All the ways you can use it were passed down from simple folks using what they had on hand when they were hungry. 


This is the heart of America ingredients passed down generations of other families, not of my own, as my own family didn't eat wheat products. I admire those pioneer families that contributed to these ingredients...and now you can play with this yourself. 


***


In the near future I will post a gluten free one...after I have tested some different flour mixes. So far gluten free flours and starches have too gooey a result to my satisfaction...till then...tried and true below. Have fun and explore!!

***


Baking time 15-20 minutes
Oven temperature 450F
Preparation time 20 minutes
Can be frozen or reheat later in a foil pouch, 350F for 15-20 minutes
Makes 12-18 
~~~~~~~~~~~~~~~~~~~~
·                  Large mixing bowl
·                  Measuring spoons
·                  Dry measure cups
·                  Liquid measure cups
·                  Wax paper 
·                  Parchment paper
·                  Rolling Pin or bottle or??? even your hands...what ever works for you!
·                  Happy face
~~~~~~~~~~~~~~~~~~~~
2 Cups sifted flour, I use Barley Flour but you may use All Purpose Flour
1 teaspoon salt
2 teaspoon baking powder
1/4 teaspoon baking soda
1/3 Cup CHILLED sweet unsalted butter
3/4 Cup CHILLED buttermilk


Sift flour, salt, baking powder, baking soda all together in a large mixing bowl. I use a ceramic large bowl as it keeps the ingredients chilled better. Mix using your clean hands till mixed very well.


Cut the COLD CHILLED butter with a knife into small pieces. Toss into bowl and with your fingers coat the butter first. Then with flour and your fingers smoosh and pinch with fingers the flour and butter. Continue till the flour and butter begin to appear as if it is grainy course meal, like corn meal.


With your hands, make a small well in the center of your bowl of flour and butter. Make it big enough to hold a cup. Then pour the buttermilk in this center well. With your fingers spread wide, like a fingered fork, slowly work the flour into the wet buttermilk, as if making a wet mud puddle drier with the outside ingredients of the well you made. Mix only till all the ingredients are moist and no dry. Do not over mix or it will turn out like a rock. Remember a mud pie quality!


Now here are several things you can do now that you have the mixture ready to shape.


***Dumplings
Add grated cheese of any kind, about 1/4-1/2 cup...or
fresh or dry herbs, about 1/4-1/2 teaspoon...or
pepper flakes, chili powder...or?? use your imagination!
Using a large serving spoon that holds about 2 tablespoons, plop by spoon into boiling soup adjusted heat down to not boiling, stock like chicken or vegetable soup. Place lid on pot and reduce the heat to very, very low. Let it steam for about 10-15 minutes. Then remove lid and the dumplings should set up an have expanded into dumplings. Ladle into bowls and enjoy. ~~ Note: Make sure you have enough room on the top of the pot to allow for dumplings or you will have a mess!~~


***Hurry up breakfast biscuits
Plop dough onto wax paper. Shape and pat into large round pie about 1/2 to 1 inch thick. If to wet, sift a little flour on the wax paper first. Place another wax paper on top. Flip and turn the dough between the wax paper as if the dough is sandwiched between the wax paper. Peel off one side of the wax paper, cut like a pie into 8 wedges. Place on parchment lined cookie sheet. Sides touching for soft, 1" apart for crusty sides. Brush with a little buttermilk or milk for glistening tops. Bake 450 for 15-20 minutes. Watch that it doesn't burn or get to brown.


***Fancy stuff
Divide dough into two parts. Sandwich one of the dough parts and roll like a rectangle. Do the same with the other dough part from here on out so you have two same results at the end. 


Roll to 1/2 inch thick.


 Remove one side of the wax paper and spread some softened butter ontop. Do the same with the other dough part. 


Roll up from long side so you have a long jelly roll. 


Make cuts in equal width apart, cut all the way down. Lay the cut edge down on parchment lined cookie sheet. You will have rolls with the appearance of palmier cookies, but biscuits. When they are all lined up touching, brush with milk or butter. Bake 450 for 15-20 minutes. 
~~Note: When you get to the fun fancy stuff, try rolling the jelly roll from opposite ends, one side more rolling than the other and your results will be the same as my pics.~~


Peanut Butter Bar Cookies


Winter is for comfort foods. Something to nibble on while reading a book, near the fireplace, under a cozy afghan, curled up sharing your nook with the cat, reading out loud to half open eyes of little children or watching that late night scary movie with the lights all off in the house.

I figured out that I could not repeat the same peanut butter bar cookies from my private school cafeteria. The were smothered in powdered sugar and smooth and gooey to the point of almost being raw...but this fills the cookie jar...well, maybe for 15 minutes with Billy around. I omit the powdered sugar, it didn't need since Billy wolfs it down so quickly...

Preheat oven 350 (325 if using glass pans)
In large bowl, mix with wire whip (Caution: dough will be heavy and stiff, I use a bowl and wooden spoon for the later mixing. But if you have a paddle for your mixer better yet!)
2 Eggs
1 Cup cane sugar
1/2 Cup brown cane sugar
1/2 Cup peanut butter (Jif or your favorite, smooth or nutty)
1 teaspoon vanilla
Mix well, then add
1-1/2 Cups flour (I use barley flour or all purpose)
2 teaspoons baking powder
Lastly add any other item you want to mix in...such as 1 Cup salted peanuts...candy...!?
Mix well, dough will be stiff.
Place into parchment lined glass pan, 9" square or 11x7x2 rectangle glass pan.
Using clean hands, press evenly spreading the dough to cover the bottom of the pan. At the end I use a spatula and do the final spreading which leaves a impression in the top of the dough..just for fun, not other reason...fingerprings are art too :)!
Bake 30 min. Cool....cut with sharp knife into bars...makes 18 generously sized bars.
Hint: While hot out of the oven, any candy or chips that melt with heat can be pressed into the top layer before the pan cools.
....Enjoy!


Saturday, January 14, 2012

S'mores at Oak Hill Camp


Smore's to me was all about the marshmallow. I knew of only one reason to have marshmallows....toasting them at a campfire. 

I have a fondness of toastie marshamallows. The center becomes liquid and the outer skin becomes a toastie soft crunch that makes your eyes close, and think of the snap and crackle of a campfire.  Next....this is so easy, you don't need a mixer. Just a good arm, a wooden spoon and a medium bowl. I use parchment paper on two cookie sheets. Now sing...There goes John Jacob Jingle Heimer Smith..lala la la lala la...

11 Tablespoons softened, unsalted butter
1 Cup packed brown cane sugar
1/2 Cup granulated pure cane sugar
Beat till smooth in large mixing bowl

2 eggs
Break eggs up and beat into creamed butter sugar mixture just a little bit at a time. 


Beat a few strokes till it is mixed well.


1 teaspoon each baking soda, cinnamon, vanilla (you may omit cinnamon if you prefer)


1 Cup bread flour 
1-1/2 Cups rice flour


Mix a little at a time till well combined.


1/2 Cups Hersheys milk chocolate chips
2 Heaping Cups mini marshmallows (Didn't I mention I love marshmallows?)


Fold to mix all.


Now, start oven at 375.
Place parchment paper on cookie sheet.


Lay four square graham crackers 1/2 inch apart by four up to total 16 squares per cookie sheet.


Spoon using one tablespoon per cracker. I use a small spatula to help.


Using a gloved hand, carefully press down a bit to firm upon the cracker.


Place into oven. Set timer to 5 minutes......


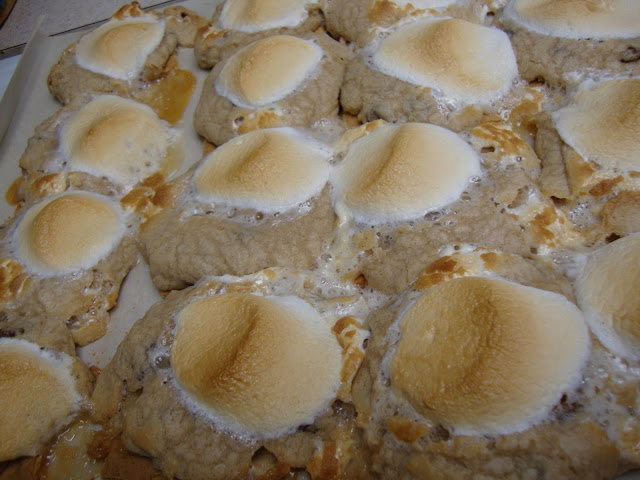
After this 5 minutes, remove from oven. I place my cookie sheets on the electric burners as I have limited counter top space. The cookies should look like this....


Now using regular sized marshmallows. Take 16 marshmallows, and using scissors, cut diagonal and place half on each cracker so you have 32 halves placed.


Placing one piece cut edge down, pressing onto center of cracker.


Return to oven a second time, again for about 5-7 minutes. Watch for brownness you prefer of the marshmallow but you shouldn't need more than the total 7 minutes. Let cool and remove to plates.
***EnjoY***